Dr. Seuss Green Eggs and Ham Oreos
Here is a fun and easy snack you can make at home.
INTRODUCTION
Dr. Seuss Green Eggs and Ham Oreos are a bright and fun treat. They look like the green eggs from the book. They are simple to make. You only need a few items and a little time. Kids and guests will smile when they see them. If you like small party bites, you might also enjoy the crunchy flavors in crispy pitta chips and chickpeas, which show how simple snacks can pack a big smile.
These cookies are great for a book party, a school event, or a fun snack at home. The cookies are sweet, creamy, and bright green. You can make a lot fast. You can also decorate them in many ways. The steps are clear and easy to follow for any cook.
WHY YOU WILL LOVE THIS RECIPE
You will love these Oreos because they are fast and fun. The recipe uses just a few parts. The Oreos are ready in minutes. You do not need a lot of tools. The green color looks great on a plate. The candy eyes and sprinkles make them cute. You can make them with kids. Kids can help dip, press eyes, and add sprinkles.
This snack is good for many events. You can bring them to a potluck or save them in a bag for later. They pair well with other small bites. If you like quick no-bake sweets, you will also like the easy taste of apricot and chocolate bars. Both treats show how a few steps can make a tasty result.
HOW TO MAKE Dr. Seuss Green Eggs and Ham Oreos
This recipe is quick. It has clear steps. You will melt candy, add color, dip the Oreos, and then add the fun bits. You can make a whole tray in one go. The trick is to keep the chocolate warm and smooth. Work in small batches if you need to. If you enjoy maker-style snacks, this method is like making a simple party bite such as baked brie with fig jam and pecans, where a few moves create a lovely plate.
Take time to plan where you will set your Oreos to harden. Use a baking sheet with paper under them for easy clean up. Keep extra sprinkles and eyes in a small bowl so your hands stay clean.
EQUIPMENT NEEDED
- Microwave-safe bowl or double boiler
- Small spoon or fork for dipping
- Baking sheet
- Parchment paper or silicone mat
- Small bowls for sprinkles and eyes
- Cooling rack (optional)
Ingredients You’ll Need :
Oreos, green food coloring, white chocolate or vanilla candy melts, candy eyes, decorative sprinkles or edible glitter
STEP-BY-STEP INSTRUCTIONS :
- Melt the white chocolate or candy melts according to package instructions.
- Add green food coloring to the melted chocolate until you achieve the desired shade of green.
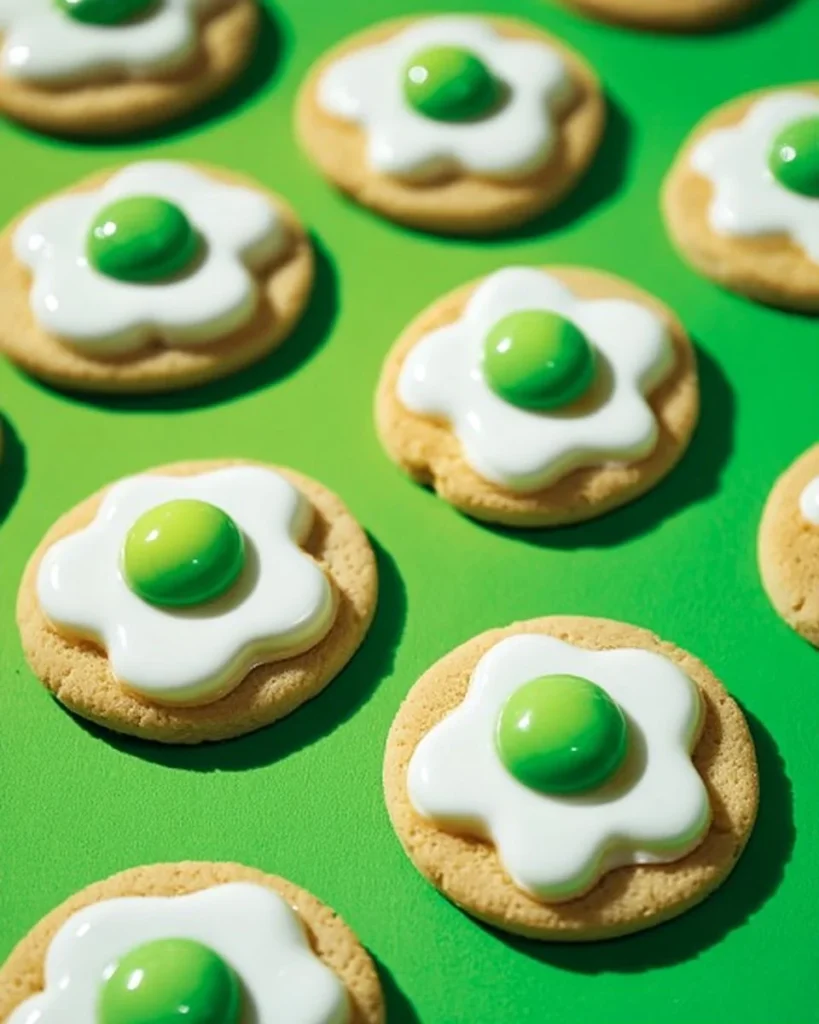
- Dip each Oreo into the green chocolate, coating it evenly.
- Place the coated Oreos on a baking sheet lined with parchment paper.
- While the chocolate is still wet, add candy eyes and sprinkles on top for decoration.
- Allow the Oreos to set and harden before serving.
- For the cookie card printable, create or print a themed card to accompany the cookies.

After the chocolate hardens, move the Oreos to a clean plate. If some spots are thin, you can add a second dip or spoon extra chocolate on top. Keep the candy eyes pressed in until the coating starts to firm up so they do not fall off.
HOW TO SERVE Dr. Seuss Green Eggs and Ham Oreos
Serve these Oreos on a plain white plate to make the green pop. You can stack them in a small tower or lay them flat in a single layer. Place a few near a small bowl of milk or a tea cup for a snack tray. For a party, place the Oreos on a tray next to savory bites and fresh fruit.
Try making small printable cards that say “Green Eggs and Ham” to place near the treats. This tweak makes the snack feel special. You can also serve them with a small cup of fruit for a light and sweet table. Pair them with a soft cheese bite if you want a mix of sweet and savory, such as the sweet and nutty flavors found in the Boursin appetizer with pistachios and honey for a nice contrast.
STORAGE & FREEZING : Dr. Seuss Green Eggs and Ham Oreos
Store the Oreos in an airtight container at room temperature. They will stay fresh for about 3 to 5 days. If your home is warm, keep them in the fridge to prevent the coating from getting soft. Place a sheet of parchment between layers so they do not stick.
To freeze, first let the Oreos set fully. Lay them on a tray and freeze for 30 minutes. Then move them to a freezer-safe bag or box with paper in between layers. They freeze well for up to 2 months. Thaw in the fridge or on the counter for about 30 minutes before serving.
SERVING SUGGESTIONS
- Make a themed dessert table with green treats and simple signs. You can put a few cookies on small plates for kids.
- Mix them with other small sweets for a fun tray. Try pairing with fruit or small cheese bites like brie and fruit slices. For a light and sweet board, try crostini like brie, apple and honey crostini as a contrast.
- Use them as cupcake toppers for a green theme. Press one Oreo on top of a frosted cupcake for a playful look.
- They make great party favors. Put two or three in a small clear bag and tie with green ribbon.
VARIATIONS
- Use different cookie types: Try thin Oreos, double-stuffed, or other sandwich cookies for a change in taste.
- Change the color: Swap green for blue, pink, or any color you like for a new look.
- Add flavor: Mix a small drop of mint or almond extract into the melted white chocolate for a subtle flavor change.
- Sprinkle mix: Use edible glitter, small star sprinkles, or sugar crystals for a special shine.
- Drizzle: After the green coat sets, drizzle a thin line of dark chocolate for contrast.

FAQs
Q: Can I use regular food coloring for candy melts?
A: You should use oil-based or powdered color made for candy melts. Water-based color can make the candy seize or become thick.
Q: How long does the coating take to harden?
A: At room temp, it can take 10 to 30 minutes. In the fridge it takes about 5 to 10 minutes. Do not leave in the freezer for too long or the candy may crack.
Q: Can I melt the chocolate on a stove?
A: Yes. Use a double boiler and stir often to keep it smooth and even. Do not let water touch the chocolate.
Q: What if the coating is too thin and the Oreo shows through?
A: Let the first coat set and then dip again or spoon more chocolate on top. A second coat will give a fuller look.
Q: Can I use milk chocolate instead of white chocolate?
A: You can, but milk chocolate will change the color. White chocolate or candy melts take the green color best.
Q: How do I keep the candy eyes from sliding off?
A: Press the eyes into the coating while it is still soft. Work quickly and place them gently.
MAKE-AHEAD TIPS FOR Dr. Seuss Green Eggs and Ham Oreos
Make the Oreos a day ahead for a party. Store them in a single layer in an airtight box. If you make them two days ahead, keep them in the fridge if your home is warm. Freeze them if you want to make them many days ahead; thaw in the fridge before the event.
You can also melt and color the candy ahead of time. Keep it warm in a small bowl over low heat or in a slow cooker on warm. Stir before you dip to keep it smooth. Prepare your sprinkles and eyes in small bowls and store them covered until use. This prep makes the dipping step fast and tidy.
Dr. Seuss Green Eggs and Ham Oreos
Ingredients
Method
- Melt the white chocolate or candy melts according to package instructions.
- Add green food coloring to the melted chocolate until you achieve the desired shade of green.
- Dip each Oreo into the green chocolate, coating it evenly.
- Place the coated Oreos on a baking sheet lined with parchment paper.
- While the chocolate is still wet, add candy eyes and sprinkles on top for decoration.
- Allow the Oreos to set and harden before serving.
- Move the Oreos to a clean plate after they harden. For thin spots, add a second dip or spoon extra chocolate on top.