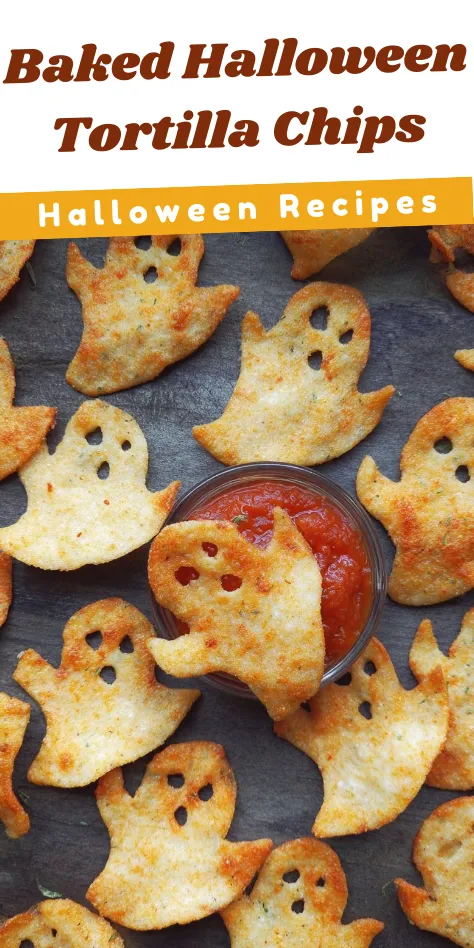
Spooky Baked Halloween Chips
Spooky Baked Halloween Chips are a fun and tasty treat that everyone can enjoy, especially around Halloween. They are easy to make, and you can shape them into cute ghost forms to bring a little fright to your festivities. These crispy chips are perfect for dipping or snacking between seasonal activities.
Making these chips is simple, requiring only a few ingredients. You can use flour tortillas to create the ghost shapes, and the best part is that they can be customized to fit your needs, whether you’re looking for gluten-free options or just want a simple, healthy snack. So, if you’re ready to add a festive touch to your Halloween celebrations, let’s dive into why you will love this recipe and how you can make it yourself!
WHY YOU WILL LOVE THIS RECIPE
This spooky chip recipe is a delightful activity for the whole family. Here are a few reasons to love it:
- Easy to Make: This recipe requires only a few simple steps, making it a great choice for beginners or kids.
- Fun Shapes: Using a ghost cookie cutter makes it exciting for children. They’ll love helping out in the kitchen.
- Healthy Snacking: Baked chips are a healthier option than fried ones. Plus, you can control the amount of salt and oil.
- Perfect for Dips: These chips are perfect for dipping in your favorite salsa, guacamole, or even a spooky pumpkin dip.
- Customizable: You can easily adjust the recipe to meet dietary needs by choosing gluten-free tortillas or different seasonings.
With all of these reasons, it’s clear that Spooky Baked Halloween Chips are a fantastic addition to any Halloween gathering or a simple family snack.
HOW TO MAKE Spooky Baked Halloween Chips
Ingredients
- 4 flour tortillas (gluten-free or grain-free, as needed)
- Spray avocado or olive oil
- Salt
- Halloween cookie cutter
STEP-BY-STEP INSTRUCTIONS
- Preheat your oven to 375 degrees F. This will get it nice and hot for baking the chips.
- Prepare your cookie sheet. Lightly grease it with spray oil to ensure the chips don’t stick.
- Cut the tortillas. While working one tortilla at a time, use the ghost-shaped cookie cutter to cut out the chips. You can usually get around 5-6 ghosts from each tortilla. Make sure to place your cuts close together to reduce waste.
- Transfer cutouts to your prepared baking sheet. Lay them in a single layer for even cooking.
- Add seasoning. Lightly mist the chips with avocado or olive oil spray. Then, sprinkle a little salt over the top to enhance the flavor.
- Bake the chips in the preheated oven for about 5-7 minutes. Watch them closely to prevent burning. They should turn golden and crispy.
- Serve them warm. Enjoy your Spooky Baked Halloween Chips immediately with dips like salsa or guacamole, or get creative with other Halloween-themed snacks like Pumpkin Taco Soup.
HOW TO SERVE Spooky Baked Halloween Chips
These spooky chips can be served in various fun and festive ways:
- With Dips: Serve your chips with a bowl of salsa, guacamole, or a creamy dip. You can even create a “Halloween platter” with various dips and snacks.
- As a Snack: They make a great snack on their own. Kids will love munching on ghost-shaped chips for a treat.
- Party Appetizer: Place them on a large platter at your Halloween party. Decorate around them with fake spiders or cobwebs for added effect.
- In a Snack Mix: Use the chips as part of a mixed snack with popcorn, candy corn, and nuts for a fun Halloween trail mix.

STORAGE & FREEZING : Spooky Baked Halloween Chips
To keep your spooky chips fresh:
- Storage: Store any leftover chips in an airtight container at room temperature. They are best consumed within a day or two for optimal crunchiness.
- Freezing: While these chips are best fresh, you can freeze them for later use. Place them in a freezer bag and seal tightly. When you’re ready to eat, reheat them in the oven at 350 degrees F for about 5-10 minutes to regain their crispness.
SERVING SUGGESTIONS
Here are a few fun ideas for serving your spooky chips:
- As Part of aHalloween Feast: Create a Halloween-themed meal where these chips are served alongside spooky chili or a pumpkin dish.
- Movie Night: Enjoy chips while watching Halloween movies. Set up a cozy spot with blankets, and snacks, for a family movie night.
- School Parties: These chips are perfect for school Halloween parties. Kids will love them, and they are a great healthy snack option.
- At Work: Bring a festive treat to work for Halloween celebrations. Everyone will appreciate the fun and health-conscious snack choice.
VARIATIONS
Feel free to get creative with your spooky chips. Here are some variations to try out:
- Seasoning Changes: Instead of just salt, you could sprinkle on different spices. Try garlic powder, chili powder, or even a bit of paprika for a fun twist.
- Different Shapes: Use other Halloween-themed cookie cutters, such as pumpkins or bats, to create a variety of shapes.
- Sweet Chips: For a sweeter version, brush the chips with a little honey or cinnamon sugar before baking to create a sweet snack.
- Whole Wheat or Corn Tortillas: Switch out the flour tortillas for whole wheat for extra fiber or use corn tortillas for a different flavor.
FAQs
1. Can I use other types of tortillas?
Yes, you can use corn tortillas or whole wheat tortillas based on your preference. Each type will give slightly different flavors and textures.
2. Can I shape the chips into other fun Halloween shapes?
Absolutely! Feel free to use any cookie cutter you have on hand, like pumpkins, bats, or even spiders, to create a variety of spooky shapes.
3. How do I make these chips gluten-free?
Simply choose gluten-free tortillas. Most major brands offer gluten-free options to help accommodate dietary needs.
4. What can I dip these chips in?
These chips pair well with many types of dips like salsa, guacamole, cheese dips, or even bean dips. You can even get creative with a pumpkin dip!
MAKE-AHEAD TIPS FOR Spooky Baked Halloween Chips
If you want to prepare your spooky chips in advance:
- Tortilla Prep: Cut the tortilla shapes ahead of time and store them in an airtight container until you are ready to bake them.
- Baking: You can bake them shortly before your event for fresh, crunchy chips. It only takes 5-7 minutes in the oven.
- Flavoring: Mix the spices and oil in advance and keep them ready to use when you decide to bake the chips.
By planning ahead, you’ll make the process even smoother and keep the spooky spirit alive for any celebration! Enjoy making and sharing your Spooky Baked Halloween Chips!

Spooky Baked Halloween Chips
Ingredients
Method
- Preheat your oven to 375 degrees F.
- Prepare your cookie sheet by lightly greasing it with spray oil.
- Cut the tortillas using the ghost-shaped cookie cutter, with about 5-6 ghosts per tortilla.
- Transfer the cutouts to the prepared baking sheet in a single layer.
- Lightly mist the chips with avocado or olive oil and sprinkle salt on top.
- Bake the chips in the preheated oven for 5-7 minutes, watching closely to prevent burning.
- Serve the warm chips immediately with your favorite dips.