INTRODUCTION
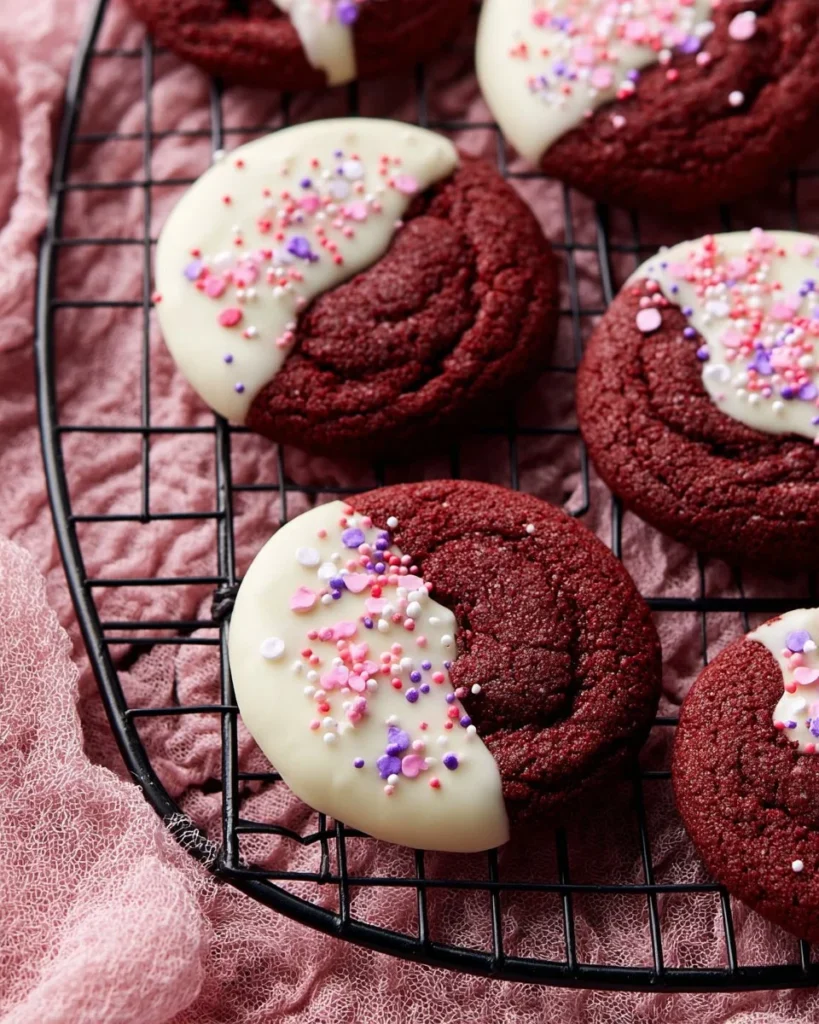
If you love cookies that are soft, sweet, and beautiful to look at, you will adore White Chocolate Dipped Red Velvet Cookies. These cookies combine the rich flavor of red velvet with the creamy sweetness of white chocolate. They are perfect for special occasions, holidays, or even just a cozy night at home. With their vibrant color and delightful taste, these cookies are sure to impress your friends and family.
WHY YOU WILL LOVE THIS RECIPE
You will love these cookies for many reasons. First, the red velvet flavor is unique and delicious. The soft texture melts in your mouth, making each bite a treat. The white chocolate adds a sweet, creamy touch that complements the rich cake-like flavor of the red velvet. Plus, they look stunning with their bright red and white colors, making them perfect for any event. Whether you serve them at a party or pack them in a lunch, these cookies will bring joy to anyone who tries them.
Another great thing about this recipe is how simple it is to make. You don’t need any fancy tools or skills to create these cookies. With just a few basic ingredients and some easy steps, you will create something that looks and tastes professional. Lastly, you can customize these cookies with your favorite sprinkles, making them unique to you.
HOW TO MAKE White Chocolate Dipped Red Velvet Cookies
Making White Chocolate Dipped Red Velvet Cookies is easy and fun. Follow these clear instructions to create your own batch.
EQUIPMENT NEEDED
- Medium mixing bowl
- Hand mixer or stand mixer with a paddle attachment
- Baking sheets
- Parchment paper or silicone baking mats
- Wire rack
- Microwave-safe bowl
- Medium cookie scoop
Ingredients You’ll Need :
- 1 and 2/3 cups (210g) all-purpose flour (spooned & leveled)
- 1/4 cup (21g) unsweetened natural cocoa powder
- 1 teaspoon baking soda
- 1/4 teaspoon salt
- 1/2 cup (8 Tbsp; 113g) unsalted butter, softened to room temperature
- 3/4 cup (150g) packed light or dark brown sugar
- 1/4 cup (50g) granulated sugar
- 1 large egg, at room temperature
- 1 Tablespoon (15ml) milk (I use buttermilk)
- 2 teaspoons pure vanilla extract
- 3/4 teaspoon gel red food coloring (or alternative)*
- Two 4-ounce bars (226g) white chocolate, coarsely chopped*
- 2-3 Tablespoons sprinkles
STEP-BY-STEP INSTRUCTIONS :
-
Prepare Dry Ingredients: In a medium bowl, whisk together the flour, cocoa powder, baking soda, and salt. Once mixed, set this bowl aside.
-
Cream Butter and Sugar: In a separate bowl, use a hand mixer or a stand mixer with a paddle attachment to beat together the softened butter, brown sugar, and granulated sugar on medium speed. Keep mixing for about 3 minutes until the mixture is creamy.
-
Add Egg and Vanilla: Add the large egg and the pure vanilla extract to the butter mixture. Mix on high until everything is well combined, which should be about 1 minute. Make sure to scrape the sides and bottom of the bowl occasionally to get all the ingredients mixed properly.
-
Combine Wet and Dry Ingredients: Gradually pour the dry ingredients into the wet mixture. Also, add the milk and gel red food coloring. Mix everything together on low speed until combined. The dough will be sticky. If you want this red hue to be more vibrant, add a little more food coloring one drop at a time.
-
Chill the Dough: Cover the bowl with plastic wrap and place it in the refrigerator. Chill the dough for at least 2 hours or up to 3 days. If you chill for longer than a few hours, let the dough sit at room temperature for 15 minutes before using it.
-
Preheat Oven: When you’re ready to bake, preheat your oven to 350°F (177°C). Line your baking sheets with parchment paper or silicone baking mats.
-
Scoop Cookies: Scoop about 1.5 tablespoons of dough using a medium cookie scoop. Roll into balls and arrange them on the baking sheet. Leave about 3 inches of space between each cookie dough ball.
-
Bake Cookies: Place the baking sheets in the oven and bake for 11-13 minutes. The edges will look set, but the centers should look soft.
-
Cool Cookies: Once baked, remove the cookies from the oven. Allow them to cool for about 5 minutes on the baking sheets before transferring them to a wire rack to cool completely.
-
Melt White Chocolate: In a microwave-safe bowl, melt the white chocolate. Do this in 15-second increments, stirring after each time until it is completely smooth. If the chocolate is too thick, stir in a teaspoon of vegetable oil to help it become more dip-friendly.
-
Dip Cookies: After the cookies have cooled, dip half of each cookie into the melted white chocolate. While the chocolate is still wet, sprinkle on your favorite colorful sprinkles.
-
Let Set: Allow the chocolate-dipped cookies to set completely. You can let them sit at room temperature or put them in the refrigerator for faster setting.
-
Store Cookies: If you have leftovers, store your cookies covered at room temperature for up to 3 days or in the refrigerator for up to 1 week.
HOW TO SERVE White Chocolate Dipped Red Velvet Cookies
These cookies are delicious on their own, but they can also be served with various beverages. They pair wonderfully with milk, coffee, or hot chocolate. You can also place them on a decorative plate for special occasions, making them look festive and inviting.
STORAGE & FREEZING : White Chocolate Dipped Red Velvet Cookies
To keep your cookies fresh, store them in an airtight container at room temperature for a few days. If you want to keep them longer, you can freeze the cookies. To freeze, place them in a single layer in a freezer-safe container. They can be frozen for up to 3 months. To enjoy them later, let them thaw at room temperature.
SERVING SUGGESTIONS
These cookies can be served at parties, family gatherings, or special celebrations. Try serving them as dessert at holiday dinners or as a sweet snack for kids’ birthday parties. You can also give them as gifts to friends and family.
VARIATIONS
If you want to mix things up a bit, you can make some simple changes to this recipe. Instead of white chocolate, try using dark or milk chocolate for dipping. You might also consider adding chocolate chips or nuts to the cookie dough for extra flavor and texture. If you want a festive touch, you can replace the sprinkles with themed decorations for holidays like Christmas or Valentine’s Day.
FAQs
1. Can I use a different type of food coloring?
Yes, you can use liquid food coloring, but gel food coloring gives a brighter shade without adding too much liquid.
2. How do I know when the cookies are done baking?
Look for the edges of the cookies to be set, while the centers should still appear soft. This will ensure that they are chewy and not overbaked.
3. Can I make the dough ahead of time?
Absolutely! You can prepare the dough and chill it in the refrigerator for up to 3 days. Just allow it to sit at room temperature for a short time before rolling and baking.
4. What can I do if the dough is too sticky?
If the dough is too sticky to handle after chilling, you can lightly flour your hands or work surface. This will help you shape the cookies without making too much of a mess.
MAKE-AHEAD TIPS FOR White Chocolate Dipped Red Velvet Cookies
To make your baking easy, you can prepare the cookie dough in advance and store it in the refrigerator. You can also bake the cookies ahead of time and freeze them unfrosted. Then, when you are ready to serve them, simply melt the white chocolate and complete the decoration. This will save you time and effort when you need delicious cookies on short notice!

White Chocolate Dipped Red Velvet Cookies
Ingredients
Method
- In a medium bowl, whisk together the flour, cocoa powder, baking soda, and salt. Set this bowl aside.
- In a separate bowl, use a hand or stand mixer to beat the softened butter, brown sugar, and granulated sugar on medium speed for about 3 minutes until creamy.
- Add the egg and pure vanilla extract to the butter mixture. Mix on high for about 1 minute, scraping the sides and bottom of the bowl occasionally.
- Gradually pour the dry ingredients into the wet mixture. Add the milk and gel red food coloring. Mix on low speed until combined. Adjust food coloring for a vibrant hue if desired.
- Cover the bowl with plastic wrap and refrigerate the dough for at least 2 hours or up to 3 days.
- Preheat your oven to 350°F (177°C) and line your baking sheets with parchment paper or silicone baking mats.
- Scoop about 1.5 tablespoons of dough using a medium cookie scoop, roll into balls, and arrange them on the baking sheet with about 3 inches of space in between.
- Bake for 11-13 minutes. The edges should look set; the centers will be soft.
- Allow cookies to cool for about 5 minutes on the baking sheets before transferring to a wire rack to cool completely.
- In a microwave-safe bowl, melt the white chocolate in 15-second increments, stirring until smooth. If it's too thick, stir in a teaspoon of vegetable oil.
- Dip half of each cookie into the melted white chocolate and immediately sprinkle on your favorite sprinkles.
- Let the dipped cookies set completely at room temperature or refrigerate for faster setting.