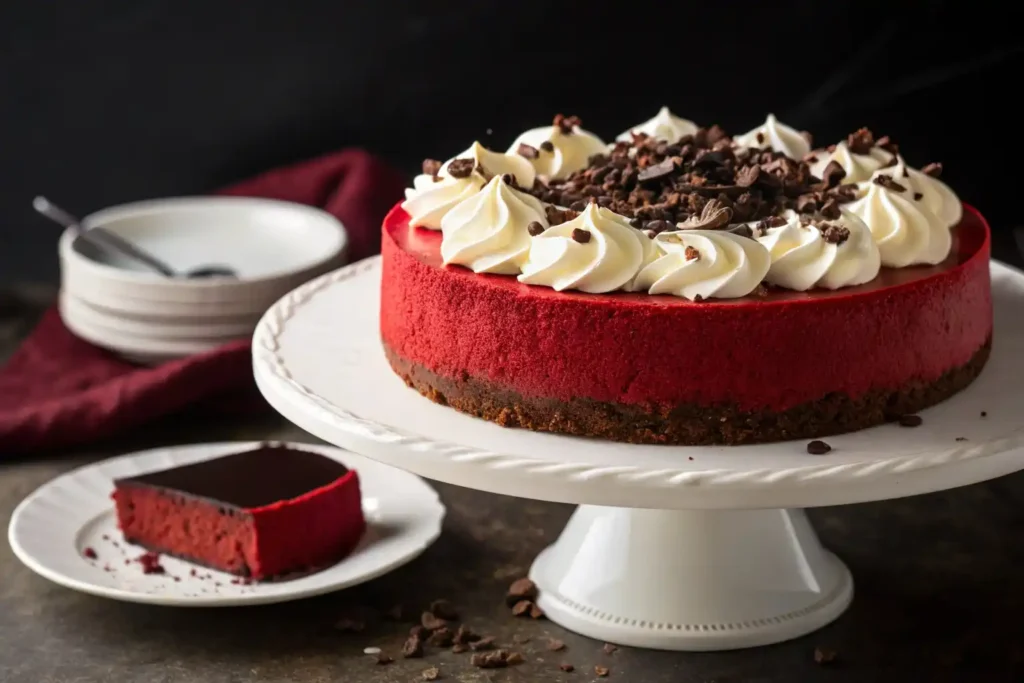
There are desserts that quietly satisfy, and then there are desserts that make an entrance—the kind that stops conversations mid-sentence and has everyone reaching for their phones to capture the moment. This red velvet cheesecake is absolutely, unequivocally the latter. The first time I made it for a dinner party, the collective gasp when I brought it to the table told me everything I needed to know about its star power.
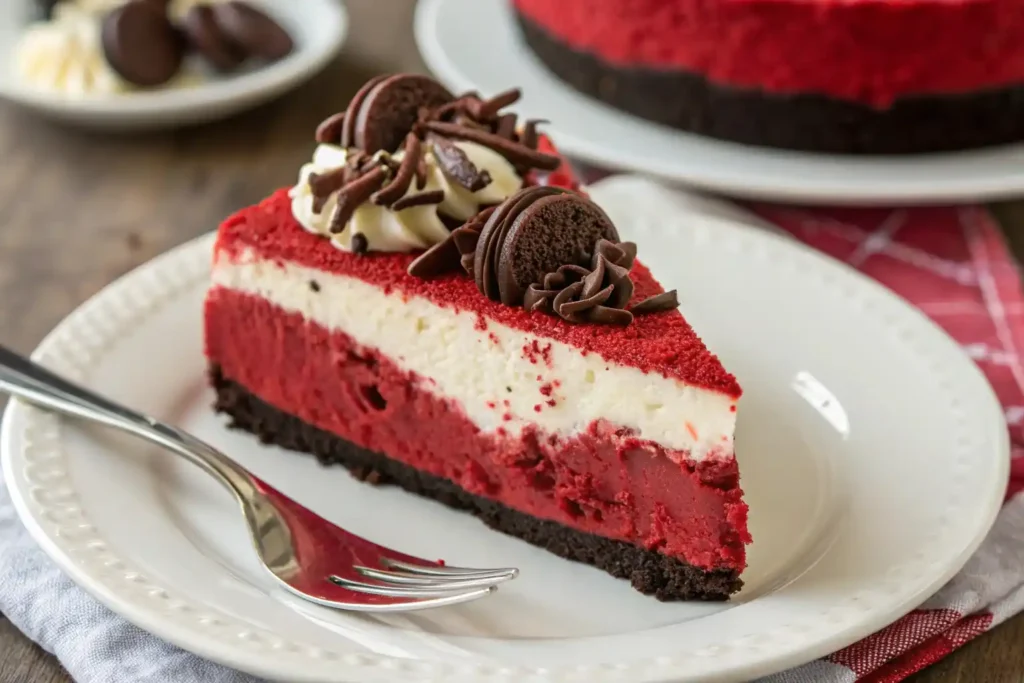
What makes this red velvet cheesecake so extraordinary isn’t just its dramatic deep burgundy color or its impossibly smooth, velvety texture—though both are absolutely breathtaking. It’s the way it combines the best of two beloved desserts into something that feels both familiar and surprisingly sophisticated. The subtle chocolate flavor paired with that signature red velvet tang, all nestled on a crunchy Oreo base and topped with billowy whipped cream, creates a symphony of textures and flavors that’s pure indulgence.
I’ll be honest—this isn’t an everyday dessert. At 540 calories per slice, it’s a special occasion showstopper, the kind of dessert you make when you want to create memories and leave lasting impressions. But trust me, every single calorie is worth it for the joy this beautiful creation brings to the table.
Ingredients

For the Oreo base:
- 200g (7oz) Oreo cookies (about 1.5 standard packs)
- 60g (4 tbsp) unsalted butter, melted
For the red velvet cheesecake filling:
- 2 tsp unflavored gelatine powder
- 2 tbsp water
- 1 cup heavy cream, fridge cold
- 500g (1 lb) cream cheese, softened (block form)
- ¾ cup caster sugar
- 1 tsp vanilla extract
- 150g (5oz) dark chocolate (70% cocoa), melted and cooled
- 6 tsp red food coloring
For the whipped cream topping:
- 1¼ cups heavy cream, fridge cold
- 3 tbsp caster sugar
- 1 tsp vanilla extract
For decoration:
- 2 tbsp shaved or grated dark chocolate
Instructions
1. Prepare your springform pan Here’s a professional tip that makes all the difference: flip the base of your 20cm (8-inch) springform pan upside down—this eliminates the lip and makes removing your finished cheesecake so much easier! Lightly butter the base, press on a square of baking paper, then clip the sides on. Line the sides with more baking paper, letting excess hang over the edges for easy removal later.
2. Create the Oreo base Break up your Oreo cookies by hand and blitz them in a food processor until they become fine, even crumbs. Add the melted butter and pulse until everything is well combined and holds together when pressed. Transfer to your prepared pan and press firmly into an even layer—I use the bottom of a flat-bottomed measuring cup for this. The key is making it compact so it holds together beautifully when sliced.
3. Bloom the gelatine Place the water in a small bowl and sprinkle the gelatine powder evenly across the surface. Stir gently and let it sit for 5 minutes—it will transform into what looks like solid rubber. This “blooming” process is crucial for smooth incorporation later. Microwave for 15 seconds to liquify, stir well, then let cool for 3-5 minutes. It must be liquid when you add it to the mixture!
4. Whip the cream In a clean bowl, whip the cold heavy cream until stiff peaks form—this takes about 2-3 minutes on high speed. Set aside while you prepare the cream cheese base.
5. Create the cheesecake base Using the same beaters (no need to clean them), beat the softened cream cheese and sugar for 2 full minutes on high speed until completely fluffy and smooth. Add the cooled liquid gelatine and vanilla, beating for another 30 seconds to incorporate thoroughly.
6. Make it magnificently red Add your lukewarm melted chocolate and red food coloring—yes, you really do need 6 teaspoons for that gorgeous deep red! Beat well for a full minute until the color is even and seductive. You’re aiming for a rich, burgundy red rather than bright cherry—the chocolate deepens it beautifully.
7. Fold with finesse Add one-third of your whipped cream to the cream cheese mixture and gently fold until just combined. Then fold in the remaining cream in two additions, being careful not to overmix and deflate all that lovely air you’ve incorporated.
8. Set and wait Pour the mixture into your prepared pan and refrigerate for at least 6 hours, though overnight is even better. This patience is absolutely crucial for clean, perfect slices.
9. The grand reveal When ready to serve, release the springform sides and use the paper to slide your cheesecake onto a serving platter. Peel away the side papers, then carefully slide out the bottom paper. Whip your topping cream with sugar and vanilla until soft peaks form, pile it in the center leaving a border, and finish with chocolate shavings.
Tips & Variations
Gelatine success: The key to smooth cheesecake is properly bloomed and cooled gelatine. If it sets up again before you use it, just microwave for another 10 seconds and let it cool briefly.
Color perfection: Red food coloring varies by brand and region. In the UK and EU, gel colorings like Sugarflair or Wilton work best due to stricter regulations on liquid colorings. Start with less gel and build up gradually.
Cream cheese matters: Use block cream cheese, not spreadable versions, for the best texture. If you can only find spreadable, add an extra ½ teaspoon of gelatine to compensate.
Make-ahead magic: This cheesecake actually improves after a day in the refrigerator. You can make it up to 3 days ahead—just add the whipped cream topping on serving day for the best presentation.
Chocolate alternatives: While 70% dark chocolate creates that stunning deep burgundy color, regular dark chocolate works beautifully too, just with a slightly brighter red result.
For more show-stopping desserts, you might love our Ultimate Moist Chocolate Cake or try something fruity with our Heavenly Lemon Blueberry Pound Cake. And if you’re in the mood for more indulgent treats, our Simple Yogurt Cake offers a lovely contrast in its elegant simplicity.
Final Thoughts
Creating this red velvet cheesecake is more than just following a recipe—it’s about crafting an experience that brings people together in wonder and delight. Yes, it requires a bit more time and attention than your average dessert, but watching faces light up when you present this stunning creation makes every step worthwhile.
The combination of that rich, chocolatey cream cheese filling with its vibrant color, the satisfying crunch of the Oreo base, and the light, airy whipped cream topping creates a dessert that’s as beautiful to look at as it is delicious to eat. Each bite delivers that perfect balance of tangy cream cheese, subtle chocolate, and pure indulgence that red velvet is famous for.
This is the dessert I reach for when I want to celebrate something special—birthdays, anniversaries, or those moments when life calls for a little extra magic. It’s proof that sometimes the most memorable meals aren’t about complicated techniques or exotic ingredients, but about taking classic flavors and presenting them in a way that feels extraordinary.
From my kitchen to yours—happy baking, and here’s to desserts that create unforgettable moments!
Red Velvet Cheesecake
Ingredients
Method
- Prepare your springform pan: flip the base of your 20cm (8-inch) springform pan upside down and lightly butter it, press on a square of baking paper, then clip the sides on, lining the sides with more baking paper.
- Break up Oreo cookies and blitz in a food processor until fine; combine with melted butter and press into the prepared pan.
- For the gelatine, place water in a small bowl, sprinkle gelatine across, let sit for 5 minutes, then microwave for 15 seconds to liquify; cool for 3-5 minutes.
- Whip the cold heavy cream until stiff peaks form and set aside.
- Beat the softened cream cheese and sugar for 2 minutes until fluffy; add cooled gelatine and vanilla, mixing for another 30 seconds.
- Add melted chocolate and red food coloring, mixing until even.
- Fold whipped cream into cream cheese mixture in three additions, being careful not to deflate.
- Pour mixture into prepared pan and refrigerate for at least 6 hours, preferably overnight.
- Release the springform sides, remove the paper, whip topping cream with sugar and vanilla until soft peaks form, pile on top, then finish with chocolate shavings.