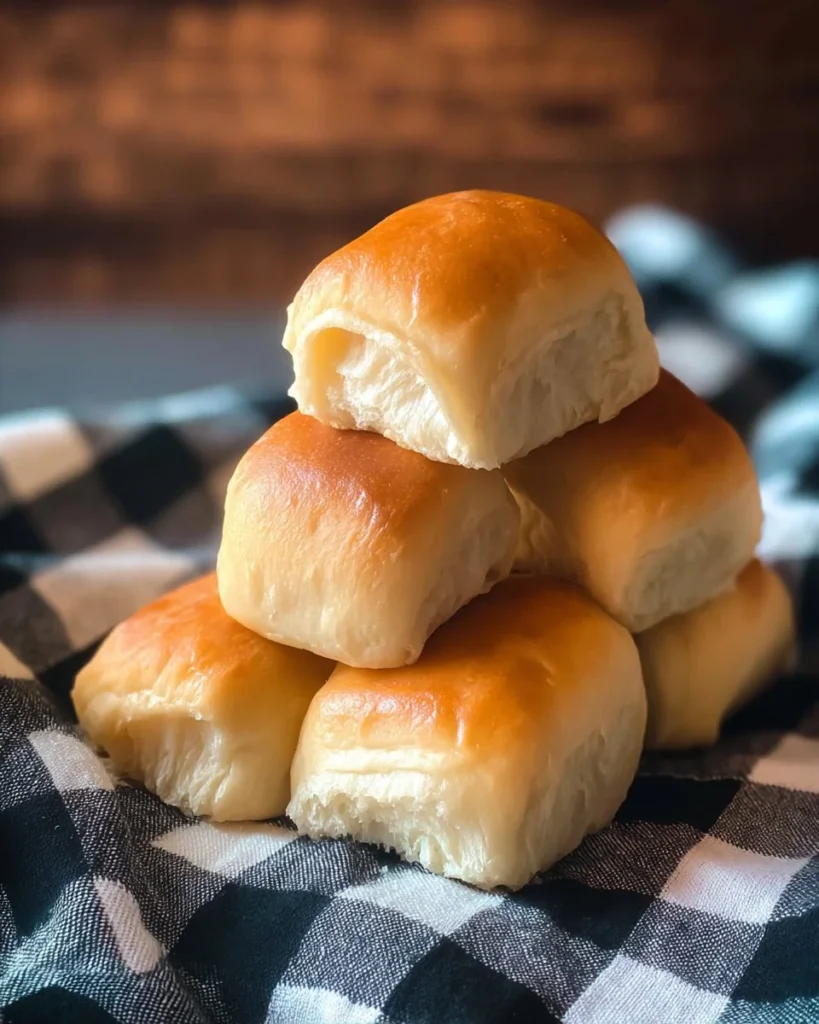
Lion House Dinner Rolls
Warm, soft dinner rolls can make any meal feel special.
INTRODUCTION
Lion House Dinner Rolls are soft, slightly sweet rolls that bake up light and tender. They come from a classic recipe loved for its pillowy texture and golden tops. This version keeps the simple, homey taste while letting you make a few healthy swaps if you want a lighter option. If you enjoy the comfort of fresh rolls, you might also like the tangy edge of sourdough dinner rolls, which use a different starter but offer similar comfort.
These rolls work well as a dinner side, a weekend bake, or a make-ahead treat for busy weeks. The dough is forgiving, so home bakers of any skill level can save time and still get bakery-style results.
WHY YOU WILL LOVE THIS RECIPE
- Easy and forgiving: The dough is soft and easy to shape. You do not need perfect technique to get great results.
- Great for meal prep: Make a batch and freeze extras. Thaw and warm to serve with salads, soups, or proteins.
- A lighter option is possible: With simple swaps like reduced butter or using part whole wheat flour, you can make a healthier version that adds fiber.
- Good for weight loss when portioned: These rolls are comforting but portion control keeps them part of a balanced plan. Enjoy one roll with a protein-rich soup for a balanced meal.
- Flexible for dietary needs: You can lower sugar, use low-calorie spreads, or try a high-protein version for a more filling bite.
These points show how the recipe can fit into a healthy lifestyle while still tasting indulgent.
HOW TO MAKE Lion House Dinner Rolls
Make the dough in one bowl, let it rise, shape into rolls, and bake. The steps are simple and clear. If you like cheesy or rich sides, these rolls pair nicely with warm cheese snacks; try a pairing like baked brie in crescent rolls for a special meal. Below you will find the full ingredient list and the step-by-step instructions to follow.
EQUIPMENT NEEDED
- Large mixing bowl
- Stand mixer with dough hook (or a large bowl and strong hands)
- Measuring cups and spoons
- Pastry mat or floured counter
- Rolling pin
- Pizza cutter or bench scraper
- Baking sheet or greased baking pan
- Plastic wrap or clean towel
- Pastry brush for butter
Ingredients You’ll Need :
2 cups very warm water, 2/3 cup instant nonfat dry milk, 2 Tbsp dry instant yeast, 1/4 cup sugar, 2 tsp salt, 1/3 cup shortening, butter or margarine ((I put mine in the microwave for 15 secs to soften it)), 1 egg, lightly whisked, 5 to 5-1/2 cups AP flour
STEP-BY-STEP INSTRUCTIONS :
In your large mixer bowl, combine the water and the milk powder and stir until the milk dissolves.
Add the yeast to the mixture and let proof for a minute or two.
Add the sugar, salt, shortening, egg and 2 cups of the flour to the yeast mixture. Whisk everything together well.
Place the bowl on the mixer with the dough hook, and add 2 more cups of flour then mix on low speed for 2-3 minutes.
Add another 1 cup of flour and mix again.
If needed, add the remaining 1/2 of a cup of flour – The dough should be soft, not overly sticky, and not stiff. (It is not necessary to use the entire amount of flour. The softer the dough, the lighter the roll.)
Scrape the dough off the sides of the bowl and move the dough around as you spray non-stick spray around the sides of the bowl. Spray the dough with the oil too. (This helps prevent the dough from drying out.)
Cover with plastic wrap and/or a cotton towel and allow to rise in a warm place until double in size, about an hour. (I preheat my oven to just about 100 degrees then turn it off and let the dough sit in there for an hour.)
After the dough has risen, sprinkle a pastry mat or your counter with flour and scrape the dough out on to the prepared surface.
Roll the dough in to a large rectangle. (For 3 rows of 8 make your rectangle about 20×12.)
Brush melted butter over the entire dough rectangle, then cut your rolls 2-1/2 inches by 4 inches, using a pizza cutter and your fingers as guides as she shows you in the video.
Flip the rolls with the butter on the inside and place the rolls on a greased baking pan, spacing them equally apart doing 6 rolls on the long side x 4 rolls on the short.
Optional: If you are making these the day before, you can now cover the rolls with saran wrap and place the tray in the refrigerator for up to 18 hours. When ready to bake, remove from the refrigerator, let rise for one hour, then skip to instruction 15.
Cover loosely with a clean towel and let rise in a warm place until the rolls are double in size (approx. 30 minutes.).
When ready to bake, preheat the oven to 375.
Remove the cover from the rolls and bake at 375 for 15-20 minutes or until they are browned to your satisfaction. Remove from the oven and immediately brush with melted butter. (Yields about 2 dozen rolls.)

HOW TO SERVE Lion House Dinner Rolls
Serve warm with a light spread of butter or a low-fat herb spread. For a healthy version:
- Offer one roll with a bowl of vegetable soup and a serving of grilled chicken for a balanced plate.
- Use small rolls or cut portions to control calories.
- Turn a roll into a sandwich with lean turkey, spinach, and mustard for a high protein meal on the go.
Portion control tip: A single roll is about one serving. Pair it with a high-protein main or a large salad to keep the meal balanced and suitable for weight loss goals.
STORAGE & FREEZING : Lion House Dinner Rolls
- Room temperature: Store in an airtight container for up to 2 days. Keep away from direct heat.
- Refrigerator: Place cooled rolls in a sealed container for up to 5 days. Reheat in a warm oven for best texture.
- Freezing: Freeze cooled rolls in a freezer bag for up to 3 months. Thaw at room temperature and warm in the oven or microwave. This makes the recipe great for meal prep — bake once, use many times.
For quick reheat, wrap a roll in a damp paper towel and microwave for 10–15 seconds, then crisp in a hot oven for 3–5 minutes.
SERVING SUGGESTIONS
Pair these rolls with healthier sides for a satisfying meal:
- Roasted vegetable salad and grilled fish for a heart healthy plate.
- Lentil soup or chicken chili for a balanced, higher protein meal.
- Sliced avocado and tomato for a light, fresh side.
For a sweeter brunch, serve them alongside other pastries like brown butter eggnog cinnamon rolls sometimes, keeping those as an occasional treat.
VARIATIONS
- Healthier version: Replace 1 to 2 cups of all-purpose flour with whole wheat flour for added fiber. Reduce the brushed butter on top, or use a light olive oil spray. This change gives a higher fiber roll that supports fullness and digestive health.
- High-protein or low-carb version: Use a mix of vital wheat gluten and high-protein flour or add whey protein isolate (unflavored) to increase protein. For a low-carb roll, try a separate low-carb bread recipe using almond flour and psyllium husk; note texture will change. The high-protein idea makes a roll that helps make meals more filling and may be a good choice for a high protein meal.
- Air fryer or oven-baked option: The recipe is oven-baked by default. For an air fryer trial, bake small rolls at 325°F in the air fryer basket for 8–12 minutes depending on size, checking for golden tops. The air fryer can make a faster batch and is a handy lighter option for single servings.

FAQs
Q: Are these rolls good for diabetic-friendly eating?
A: You can make them more diabetic-friendly by cutting portion size, using less sugar, or swapping part of the flour for whole grain flour to add fiber. Pair a roll with protein and non-starchy vegetables to limit blood sugar spikes.
Q: Can I use whole milk instead of nonfat dry milk?
A: Yes. Use the liquid milk equivalent but reduce warm water slightly. Whole milk will add richness and a few more calories; it is fine as a lighter option if you reduce butter elsewhere.
Q: How long do leftovers keep in the fridge?
A: Store cooled rolls in an airtight container for up to 5 days. Reheat in the oven for best texture. Freezing is better for longer storage.
Q: Are these rolls low calorie?
A: The basic recipe has moderate calories because of butter and shortening. To make lower calorie rolls, reduce the topping butter and use a light spread. Portion control also makes them suitable for weight loss plans.
Q: Can the rolls be made ahead for meal prep?
A: Yes. You can shape them, cover, and refrigerate overnight. Bake the next day after they come to room temperature and rise fully. This is great for meal prep.
Q: Can I make these gluten free?
A: True gluten-free rolls require a specialist blend and different techniques. This recipe relies on gluten in AP flour, so substitution needs a tested gluten-free roll recipe.
MAKE-AHEAD TIPS FOR Lion House Dinner Rolls
- Night before: Shape the rolls, cover tightly, and refrigerate the pan up to 18 hours. Remove and let rise an hour before baking. This saves morning time and makes the rolls great for meal prep.
- Freeze baked rolls: Bake, cool, then freeze in bags. Reheat as needed for quick sides or lunches.
- Double the dough: Make a double batch and freeze half of the shaped dough or baked rolls for future meals. This saves time and ensures you always have a fresh bread option for balanced dinners.
These tips make the Lion House Dinner Rolls practical and friendly to busy schedules while allowing you to keep them part of a healthy, balanced plan. Enjoy one warm roll with a protein and vegetable side to stay mindful of calories and keep meals satisfying.
Lion House Dinner Rolls
Ingredients
Method
- In a large mixing bowl, combine the warm water and the milk powder, stirring until the milk dissolves.
- Add the yeast and let it proof for a minute or two.
- Mix in the sugar, salt, shortening, egg, and 2 cups of flour. Whisk until well combined.
- Using a stand mixer with a dough hook, add 2 more cups of flour and mix on low speed for 2-3 minutes.
- Add another 1 cup of flour and mix again.
- If necessary, add the remaining 1/2 cup of flour. The dough should be soft but not overly sticky or stiff.
- Scrape the dough off the bowl sides and coat the bowl with non-stick spray, then spray the dough as well.
- Cover with plastic wrap or a cotton towel and let it rise in a warm place until doubled in size, about 1 hour.
- Lightly flour a pastry mat or counter and scrape the dough onto it.
- Roll the dough into a large rectangle, approximately 20x12 inches.
- Brush melted butter over the entire rectangle, then cut rolls measuring 2-1/2 inches by 4 inches.
- Flip the rolls so the butter side is on the inside and place them on a greased baking pan, spacing them evenly.
- If making ahead, cover with saran wrap and refrigerate for up to 18 hours. When ready, let them rise for 1 hour.
- Cover loosely with a towel and allow to rise until double in size, about 30 minutes.
- Preheat the oven to 375°F.
- Bake the rolls for 15-20 minutes until browned to your satisfaction.
- Remove from the oven and immediately brush with melted butter.