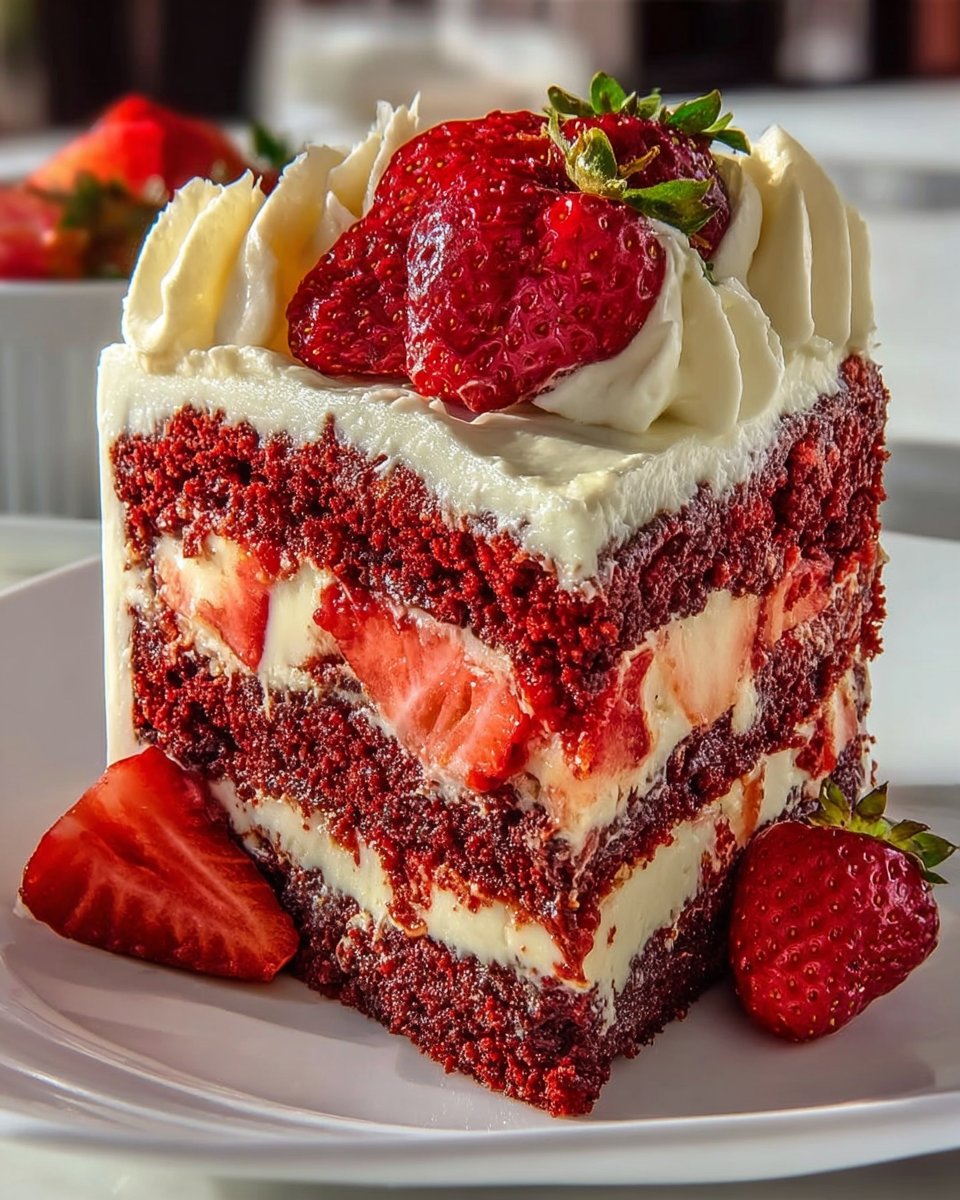
Decadent Strawberry Velvet Cake – Perfect for Any Celebration
INTRODUCTION
Celebrations come in many forms, from birthdays to anniversaries, and sometimes you just want to make a regular day feel special. With the Decadent Strawberry Velvet Cake, you can easily elevate any occasion. This beautiful cake is not only tasty but also visually stunning. The vivid red color combined with fresh strawberries and smooth cream cheese frosting makes it a showstopper wherever you serve it.
WHY YOU WILL LOVE THIS RECIPE
The Decadent Strawberry Velvet Cake is a delightful combination of flavors and textures. The cake is soft and velvety, while the sweetness of strawberries adds a refreshing touch. The cream cheese frosting is rich yet light, creating a perfect balance that keeps you wanting more.
Furthermore, making this cake can be a fun activity. It’s a great way to involve family or friends in the kitchen. You can enjoy the process together and create lasting memories. Plus, the cake is easy to make and requires simple ingredients that you likely already have at home.
Whether you’re celebrating a special event or just want to treat yourself, this cake is an excellent choice. It’s a recipe that everyone will love and remember fondly.
HOW TO MAKE Decadent Strawberry Velvet Cake
Making the Decadent Strawberry Velvet Cake is not hard at all. With a little patience and the step-by-step instructions below, you’ll create a delightful dessert that will impress your friends and family.
EQUIPMENT NEEDED
To make this cake, you will need the following equipment:
- Three 9-inch round cake pans
- Mixing bowls
- A whisk or electric mixer
- A rubber spatula
- Measuring cups and spoons
- A sifter
- A toothpick for testing the cake
- Parchment paper (for lining the pans)
- A cake stand or serving plate
- A refrigerator for chilling
Ingredients You’ll Need
- 2 ½ cups all-purpose flour
- 2 cups granulated sugar
- 1 teaspoon baking soda
- 1 teaspoon cocoa powder
- 1 teaspoon salt
- 1 ½ cups vegetable oil
- 1 cup buttermilk, room temperature
- 2 large eggs
- 2 tablespoons red food coloring
- 1 teaspoon white vinegar
- 1 teaspoon vanilla extract
- 16 oz cream cheese, softened
- 1 cup unsalted butter, softened
- 5 cups powdered sugar
- 2 teaspoons vanilla extract
- 4 cups fresh strawberries, sliced
- Whipped cream (for garnish)
- Whole strawberries (for topping)
STEP-BY-STEP INSTRUCTIONS
-
Preheat the oven: Set your oven to 350°F (175°C). Grease and flour three 9-inch round cake pans. Line the bottoms of the pans with parchment paper to make it easier to remove the cakes later.
-
Mix dry ingredients: In a large bowl, sift together the flour, sugar, baking soda, cocoa powder, and salt. This will help to evenly distribute the dry ingredients.
-
Combine wet ingredients: In another bowl, whisk together the oil, buttermilk, eggs, red food coloring, vinegar, and vanilla extract until smooth.
-
Make the batter: Gradually add the dry ingredients to the wet mixture. Stir until the batter is smooth and free of lumps.
-
Bake the cakes: Divide the batter evenly among the prepared pans. Bake in the preheated oven for 25-30 minutes, or until a toothpick inserted into the center comes out clean.
-
Cool the cakes: Once baked, remove the cakes from the oven and let them cool in the pans for about 10 minutes. Then, turn the cakes out onto wire racks to cool completely.
-
Prepare the frosting: In a mixing bowl, beat the softened cream cheese and butter together until creamy. Gradually add the powdered sugar, mixing well. Stir in the vanilla extract and beat until fluffy.
-
Assemble the cake: Once the cakes are completely cool, place one layer on a serving plate. Spread a layer of frosting over it and add some sliced strawberries on top. Repeat with the next layer.
-
Finish the cake: Place the final cake layer on top and frost the outside of the cake. Use whipped cream to decorate and top it with whole strawberries for a beautiful finish.
-
Chill and serve: Chill the completed cake in the refrigerator for about 30 minutes before slicing and serving. This will help the frosting set and make the cake easier to cut.

HOW TO SERVE Decadent Strawberry Velvet Cake
Serve the Decadent Strawberry Velvet Cake chilled for the best taste. It’s perfect for slicing into generous pieces and serving alongside a cup of coffee or tea. The combination of cake, frosting, and strawberries makes each bite a heavenly experience.
You can also add a dollop of freshly whipped cream on each plate for an extra treat. Additionally, for a festive touch, consider serving the cake with sparkling fruit drinks or a glass of champagne during special occasions.
STORAGE & FREEZING: Decadent Strawberry Velvet Cake
To store the cake, keep it in an airtight container in the refrigerator. It can last for up to four days. If you need to keep it longer, you can freeze it. To freeze, wrap individual slices securely in plastic wrap and then in aluminum foil. This method will help maintain its freshness for up to three months. When ready to eat, thaw the slices in the refrigerator overnight.
SERVING SUGGESTIONS
The cake pairs wonderfully with various accompaniments. Here are some serving suggestions:
- Vanilla ice cream: The creaminess of the ice cream complements the cake perfectly.
- Fresh fruit salad: A mix of seasonal fruits can balance the sweetness of the cake.
- Coffee or tea: A warm drink can enhance the overall experience.
- A drizzle of chocolate or caramel sauce adds an extra layer of flavor if desired.
VARIATIONS
Feel free to get creative with this cake! Here are some variations you can try:
- Add chocolate: Introduce chocolate chips into the batter for a more indulgent flavor.
- Use different fruits: Substitute strawberries with raspberries or blueberries for a different twist.
- Adjust frosting: Use coconut cream instead of cream cheese for a lighter touch.
- Make it a layered dessert: Use the same ingredients to create a trifle by layering the cake and frosting in a glass dish.
FAQs
1. Can I use regular milk instead of buttermilk?
Yes, you can make your own buttermilk by mixing one cup of milk with one tablespoon of vinegar or lemon juice. Let it sit for about 5 minutes before using it in the recipe.
2. How can I ensure my cake layers come out evenly?
Make sure to evenly divide the batter among the three pans. Using a kitchen scale can help ensure each layer has the same weight.
3. Can this cake be made ahead of time?
Absolutely! You can bake the cake layers a day in advance and refrigerate them. Just frost them the day you plan to serve.
4. Can I make the frosting ahead of time?
Yes, you can prepare the frosting ahead of time and store it in the refrigerator for a couple of days. Just give it a good mix before using.
MAKE-AHEAD TIPS FOR Decadent Strawberry Velvet Cake
To make your preparation easier, you can follow these make-ahead tips:
- Bake the cake layers in advance: You can bake the cake layers a day early and store them in the refrigerator wrapped in plastic wrap.
- Prepare the frosting ahead: Make the frosting and store it in an airtight container in the refrigerator. When ready to use, let it sit at room temperature for about 30 minutes before frosting the cake.
- Slice the strawberries: Prepare your strawberries a few hours before serving. Keep them in the fridge to keep them fresh.
By following these tips, your Decadent Strawberry Velvet Cake will be easy to assemble, allowing you to enjoy more time with your guests!

Decadent Strawberry Velvet Cake
Ingredients
Method
- Preheat the oven to 350°F (175°C) and grease and flour three 9-inch round cake pans. Line the bottoms with parchment paper.
- In a large bowl, sift together flour, sugar, baking soda, cocoa powder, and salt.
- In another bowl, whisk together oil, buttermilk, eggs, red food coloring, vinegar, and vanilla extract until smooth.
- Gradually add the dry ingredients to the wet mixture, stirring until the batter is smooth.
- Divide the batter evenly among the prepared pans and bake for 25-30 minutes, or until a toothpick inserted into the center comes out clean.
- Remove the cakes from the oven and let them cool in the pans for about 10 minutes before transferring them to wire racks to cool completely.
- In a mixing bowl, beat the softened cream cheese and butter until creamy. Gradually add the powdered sugar and beat until fluffy.
- Once the cakes are completely cool, place one layer on a serving plate. Spread a layer of frosting and add sliced strawberries on top. Repeat with the next layer.
- Place the final cake layer on top and frost the outside of the cake. Decorate with whipped cream and whole strawberries.
- Chill the completed cake in the refrigerator for about 30 minutes before slicing and serving.