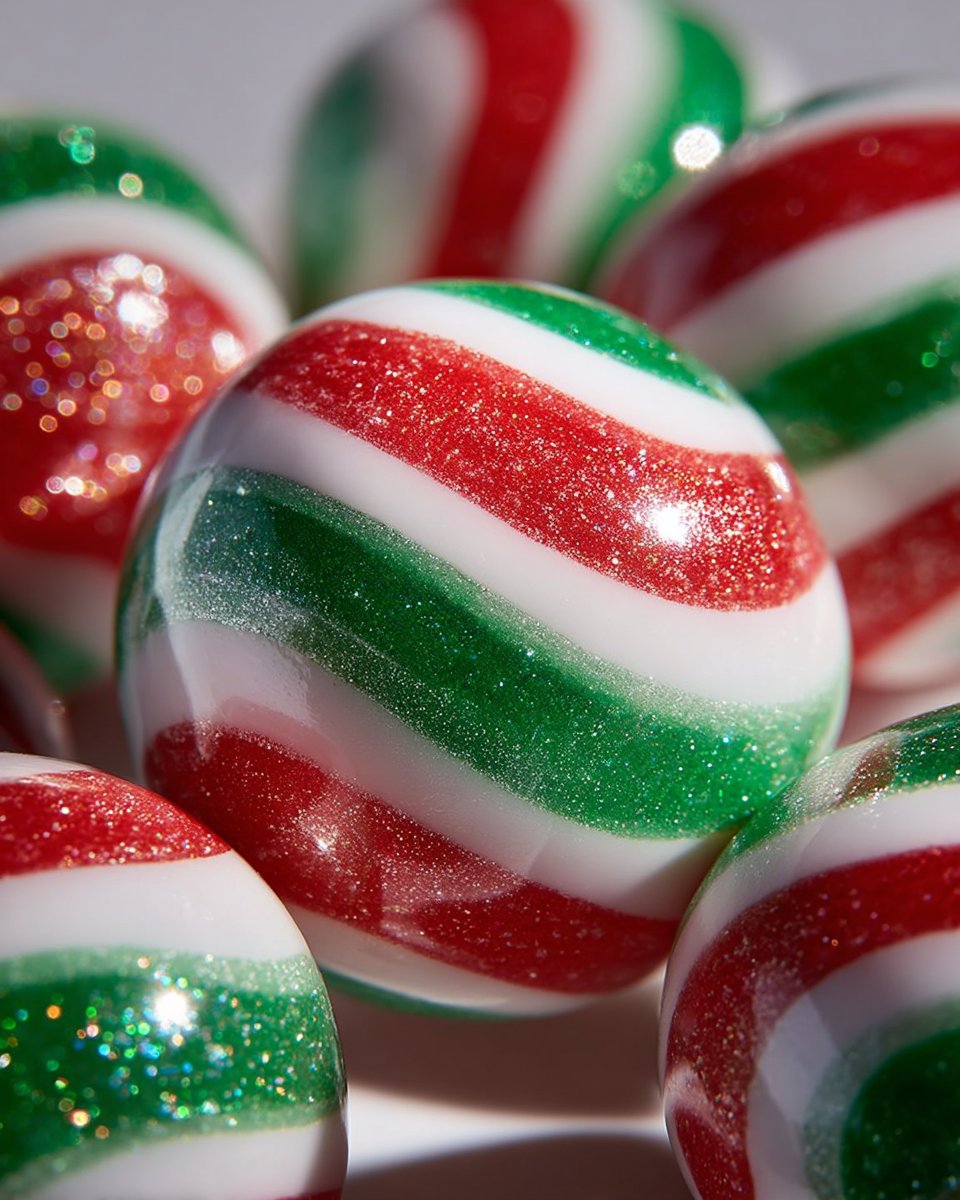
Soft Peppermint Balls
INTRODUCTION
Soft peppermint balls are a delightful treat that bring a burst of flavor and color to any occasion. These candies are easy to make and perfect for sharing during the holiday season or anytime you want a sweet and refreshing bite. With their creamy texture and sweet peppermint taste, they make a wonderful gift or a fun addition to dessert tables. This article will guide you through everything you need to know to make these soft peppermint balls at home.
WHY YOU WILL LOVE THIS RECIPE
There are many reasons to love soft peppermint balls. First, they are simple to make, requiring only a handful of ingredients. The result is a smooth and flavorful candy that melts in your mouth. They look beautiful with their vibrant colors and can be decorated to match any occasion. Plus, they are perfect for sharing with family and friends, making them an ideal candy for gatherings. Whether you enjoy them yourself or give them as gifts, these candies are sure to bring joy and sweetness to all.
HOW TO MAKE Soft Peppermint Balls
Making soft peppermint balls is straightforward and fun. The process involves mixing the ingredients to form a dough, coloring portions of it, and then shaping the candies into balls. In just a few easy steps, you have a delightful treat ready to enjoy.
EQUIPMENT NEEDED
To make soft peppermint balls, you will need some basic kitchen equipment:
- Medium mixing bowl
- Rubber spatula
- Clean surface for rolling the dough
- Measuring cups and spoons
- Parchment paper
- Airtight container for storage
Ingredients You’ll Need
- 2 cups powdered sugar (confectioners’ sugar)
- 1 tablespoon light corn syrup
- 2 tablespoons unsalted butter (softened)
- ½ teaspoon peppermint extract
- 1 tablespoon milk (plus more if needed)
- Red gel food coloring
- Green gel food coloring
- Optional: edible glitter or luster dust
STEP-BY-STEP INSTRUCTIONS
-
Prepare the Peppermint Dough: In a medium mixing bowl, combine 2 cups of powdered sugar, 1 tablespoon of light corn syrup, 2 tablespoons of softened unsalted butter, ½ teaspoon of peppermint extract, and 1 tablespoon of milk. Use a rubber spatula to mix until a smooth and pliable dough forms. If the mixture feels too sticky, sprinkle in more powdered sugar, a tablespoon at a time. The consistency should resemble soft cookie dough.
-
Divide and Color: Divide the peppermint dough evenly into three portions. Leave one portion plain white for contrast. Tint one portion red by adding red gel coloring and mixing well. Tint the last portion green using green gel coloring. Knead each portion gently until the color is uniform.
-
Roll and Layer: On a clean surface dusted with powdered sugar, roll each colored dough into ropes about ½-inch thick. For striped candy, twist the three ropes together and gently roll them again to fuse the pattern. Slice into 1-inch pieces or pinch off bits and roll between your palms to form uniform balls.
-
Add the Festive Touch: Place the finished candies on parchment paper. If you want, lightly dust them with edible glitter or luster dust for shimmer.
-
Chill & Serve: Transfer the candies to a tray and refrigerate for 30 minutes to firm up. Once set, store them in an airtight container layered with wax paper to prevent sticking. They’ll stay perfectly soft and flavorful for up to two weeks.

HOW TO SERVE Soft Peppermint Balls
Soft peppermint balls can be served in many fun ways. You can place them in decorative candy jars to brighten up your table. They also make great party favors when packaged in small boxes or bags. For a festive touch, try serving them on a holiday platter alongside other sweets, or include them in gift baskets filled with treats. Their colorful appearance adds charm to any dessert spread.
STORAGE & FREEZING : Soft Peppermint Balls
To keep your soft peppermint balls fresh, store them in an airtight container at room temperature. Layer them with wax paper to avoid sticking together. If you want to keep them longer, you can freeze them. Place the individual balls on a parchment-lined tray and freeze until solid. Once frozen, transfer them to a container or zip-top bag. They can last up to three months in the freezer. When you’re ready to enjoy them, just let them thaw at room temperature.
SERVING SUGGESTIONS
Soft peppermint balls are delightful on their own, but you can pair them with various treats. Consider serving them with hot cocoa or coffee for a cozy snack time. They also go well with other holiday cookies or snacks. For a whimsical touch, serve them with ice cream or in milkshakes for a special dessert. Their peppermint flavor compliments chocolate and vanilla nicely, making them versatile for different occasions.
VARIATIONS
If you want to mix things up, there are several variations you can try with your soft peppermint balls. Here are some ideas:
- Chocolate Coating: Dip the finished peppermint balls in melted chocolate for a rich flavor.
- Nutty Flavors: Mix in finely chopped nuts like almonds or pecans into the dough for added texture.
- Flavor Twists: Experiment with different extracts, like vanilla or almond, instead of peppermint.
- Different Colors: Use food coloring to create pastel or neon versions for parties.
FAQs
What if my dough is too sticky?
If your dough is sticky, simply sprinkle in more powdered sugar, one tablespoon at a time, until it reaches the right consistency.
Can I use other types of food coloring?
Yes, you can use liquid food coloring, but gel food coloring provides more vibrant colors and does not change the texture of the dough.
How long do soft peppermint balls last?
When stored in an airtight container, the soft peppermint balls can stay fresh and flavorful for up to two weeks at room temperature.
Can I make these candies vegan?
Yes, you can make them vegan by using dairy-free butter and milk alternatives like almond or coconut milk.
MAKE-AHEAD TIPS FOR Soft Peppermint Balls
You can make soft peppermint balls ahead of time for easy preparation. Prepare the dough and even shape the candies, then store them in the refrigerator for a few days before serving. Alternatively, you can make them several weeks in advance and freeze them. Just remember to label your container with the date to keep track of freshness. These make-ahead tips will help you enjoy the process without the last-minute rush, allowing you to focus on the fun of sharing these delightful treats.
In conclusion, soft peppermint balls are a joyful and simple recipe to create. With a few ingredients and easy steps, you can enjoy these candies that are sure to bring a smile to your face and warmth to your celebrations. Enjoy the sweet, minty flavor and the fun of making these delightful treats!

Soft Peppermint Balls
Ingredients
Method
- In a medium mixing bowl, combine 2 cups of powdered sugar, 1 tablespoon of light corn syrup, 2 tablespoons of softened unsalted butter, ½ teaspoon of peppermint extract, and 1 tablespoon of milk. Use a rubber spatula to mix until a smooth and pliable dough forms.
- If the mixture feels too sticky, sprinkle in more powdered sugar, a tablespoon at a time.
- Divide the peppermint dough evenly into three portions.
- Leave one portion plain white, tint one portion red using red gel coloring, and tint the last portion green using green gel coloring.
- Knead each portion gently until the color is uniform.
- On a clean surface dusted with powdered sugar, roll each colored dough into ropes about ½-inch thick.
- For striped candy, twist the three ropes together and gently roll them again to fuse the pattern.
- Slice into 1-inch pieces or pinch off bits and roll between your palms to form uniform balls.
- Place the finished candies on parchment paper and dust lightly with edible glitter or luster dust for shimmer if desired.
- Transfer the candies to a tray and refrigerate for 30 minutes to firm up.
- Store in an airtight container layered with wax paper to prevent sticking. They’ll stay perfectly soft and flavorful for up to two weeks.