Cheesy Halloween Breadstick Bones
Cheesy Halloween Breadstick Bones are a fun and spooky snack perfect for Halloween gatherings or themed parties. Kids and adults alike love these cheesy treats shaped like bones, making them an ideal choice for celebrating this ghoulish season. Not only do they look exciting on a spooky platter, but they also taste delicious. The combination of gooey cheese and warm, soft breadsticks creates a satisfying bite that will have everyone reaching for more. Plus, they are simple to make, requiring just a few ingredients that you might already have at home.
WHY YOU WILL LOVE THIS RECIPE
You will love this recipe for many reasons. First, it is easy to make and does not require fancy techniques. With just a few steps, anyone can create these fun breadsticks. Second, they are great for kids and adults alike; everyone can join in on the fun. Kids love the bone shape, and adults appreciate the tasty combination of cheeses. Third, they are perfect for dipping. Marinara sauce is a classic choice, but you can try other dips like ranch or garlic sauce for extra flavor. Lastly, they add a touch of whimsy to your Halloween festivities. They are not only tasty but also add to the spooky vibe of the celebration.
HOW TO MAKE Cheesy Halloween Breadstick Bones
Ingredients:
- All-purpose flour (for dusting)
- 1 pound pizza dough
- 2 tablespoons unsalted butter (melted)
- ½ cup grated Parmesan cheese
- 1 cup shredded mozzarella cheese
- Marinara sauce (for dipping)
STEP-BY-STEP INSTRUCTIONS:
- Preheat the Oven: Set your oven to 375°F and allow it to heat up. While waiting, prepare two baking sheets by lining them with parchment paper to prevent the breadsticks from sticking.
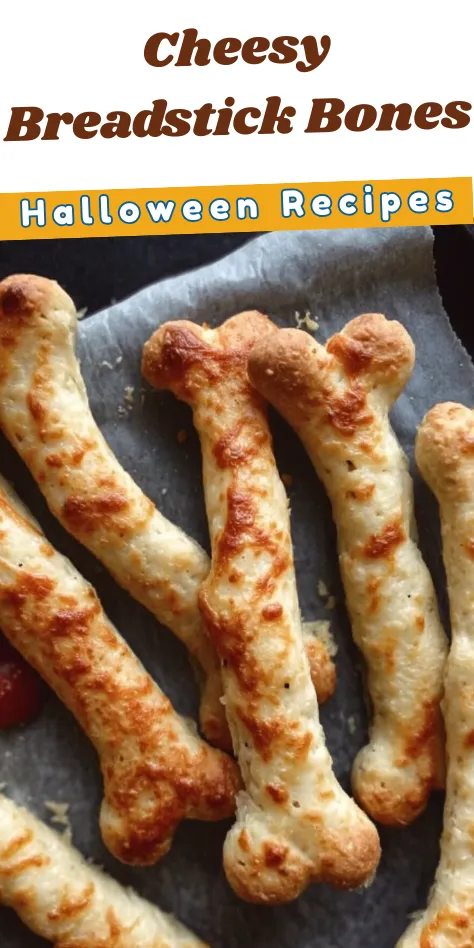
- Shape the Dough: Take your pizza dough and divide it into 10 equal portions. Roll each portion into a rope about 8 inches long. To create the “bone” effect, make sure the ends of each rope are slightly thicker than the middle. Place the shaped dough onto the prepared baking sheets, leaving some space between each piece so they don’t touch while baking.
- Snip the Ends: Grab your kitchen scissors and make two small cuts (about 1 inch deep) on both ends of each dough rope. Gently pull and stretch these cut pieces apart to create the shape of bone ends.
- Brush and Bake: Melt the butter and, using a pastry brush, generously coat each breadstick with it. Sprinkle the grated Parmesan cheese over the top for extra flavor. Place the breadsticks in the oven and bake for about 15 minutes, or until they begin to turn golden.
- Add Mozzarella: After 15 minutes, take the breadsticks out of the oven. Sprinkle the shredded mozzarella cheese evenly over each one, then return them to the oven. Bake for another 5 to 7 minutes, or until the mozzarella has melted and is bubbling.
- Serve: Once the breadsticks are out of the oven, serve them warm with a side of marinara sauce for dipping. Enjoy the spooky, cheesy snack!
HOW TO SERVE Cheesy Halloween Breadstick Bones
Cheesy Halloween Breadstick Bones are best enjoyed warm and fresh out of the oven. You can place them on a fun Halloween-themed platter to add to the festive mood. For serving, provide small bowls of marinara sauce for dipping. You could also offer other dips like ranch dressing or garlic butter for those who want something different. These breadsticks make great appetizers or snacks at any Halloween party, and they will surely be a hit among guests.

STORAGE & FREEZING: Cheesy Halloween Breadstick Bones
If you have leftover Cheesy Halloween Breadstick Bones, you can store them in an airtight container at room temperature for up to 2 days. For longer storage, it is best to freeze them. To do this, let the breadsticks cool completely, then layer them in a freezer-safe container, separating each layer with parchment paper. They can stay frozen for up to 2 months. When you are ready to enjoy them again, reheat in the oven at 350°F until warmed through, about 10 to 15 minutes.
SERVING SUGGESTIONS
These cheesy bone-shaped breadsticks pair wonderfully with a variety of dishes. They can serve as a side dish for pasta or soup. They also make great snacks for movie nights or game nights. If you’re hosting a Halloween party, consider making a festive spread with pumpkin soup, salad, and a selection of dips. You might also serve them alongside other Halloween-themed snacks like pumpkin-shaped cheese balls or ghost-shaped cupcakes. This fun combo will surely impress your guests and add more excitement to your event!
VARIATIONS
While the original recipe for Cheesy Halloween Breadstick Bones is delightful, you can explore some variations to suit your taste. Try adding herbs like oregano or basil to the melted butter for added flavor. You could also mix different types of cheeses, like cheddar or gouda, for a unique twist. If you like spices, sprinkle some red pepper flakes over the cheese before baking for a spicy kick. If you prefer a sweeter option, consider making a dessert version using sweet dough with chocolate chips. The possibilities are endless, so feel free to get creative!
FAQs
1. Can I use store-bought dough for this recipe?
Yes, you can use store-bought pizza dough or even crescent roll dough. It will save you some preparation time.
2. How do I know when the breadsticks are done baking?
The breadsticks should be golden brown and the cheese should be bubbling. Keep an eye on them during the last few minutes of baking to prevent burning.
3. Can I add fillings to the breadsticks?
Yes! You could add pepperoni, cooked sausage, or even roasted vegetables inside the dough before shaping it into bones.
4. How do I reheat the leftover breadsticks?
To reheat, place them in a preheated oven at 350°F for 10 to 15 minutes until warmed through. This will help keep them crisp.
MAKE-AHEAD TIPS FOR Cheesy Halloween Breadstick Bones
If you want to prepare in advance, you can shape the dough into bones and refrigerate them before baking. Cover the baking sheet with plastic wrap and keep them in the fridge for up to 24 hours. When you are ready to bake, take them out of the fridge and let them sit at room temperature for about 30 minutes before baking. This will ensure they bake evenly. Another option is to make extra dough and freeze shaped bones for future use. Just thaw and bake them whenever you need a delicious snack!
By following this simple recipe, you can create an unforgettable snack that adds fun and flavor to your Halloween celebrations!

Cheesy Halloween Breadstick Bones
Ingredients
Method
- Preheat the oven to 375°F and prepare two baking sheets by lining them with parchment paper.
- Divide the pizza dough into 10 equal portions and roll each into a rope about 8 inches long.
- Shape the ends of each rope to be thicker than the middle to mimic bone shapes. Place on baking sheets.
- Using scissors, make two small cuts on both ends of each dough rope and gently pull the cut pieces apart.
- Brush the breadsticks generously with melted butter and sprinkle with Parmesan cheese.
- Bake for about 15 minutes or until they begin to turn golden.
- Remove from the oven and immediately sprinkle mozzarella cheese over each breadstick.
- Return to oven and bake for another 5 to 7 minutes, until the mozzarella is melted and bubbling.
- Serve warm with marinara sauce for dipping.