Spooky Ghost Brown Butter Pumpkin Cookies
Spooky Ghost Brown Butter Pumpkin Cookies are the perfect treat for Halloween and the fall season. These cookies combine the warm flavors of brown butter, pumpkin, and maple, with a spooky twist. When topped with ghostly white chocolate and dark candy melts, they become a fun and delicious dessert. This recipe is great for sharing with friends, family, or at any Halloween gathering. You will love how easy it is to make these spooky cookies, and they always impress everyone who sees them.
WHY YOU WILL LOVE THIS RECIPE
You will love making Spooky Ghost Brown Butter Pumpkin Cookies for many reasons. First, the flavor is delightful, with hints of brown butter, pumpkin, and maple in every bite. The cookies are soft and chewy, making them a perfect treat for any occasion. The spooky ghost design adds a fun and festive touch, making them great for Halloween parties or other fall gatherings.
Another reason to love this recipe is its simplicity. Even if you are not an experienced baker, you can follow the easy steps to create these adorable cookies. The ingredients are also easy to find, so you won’t have to search far to get what you need.
Finally, these cookies are a fun project to do with your kids or friends. You can have a blast decorating the cookies together, and everyone will enjoy the final result. Whether you are baking alone, with family, or with friends, these cookies will bring joy and deliciousness to your kitchen.

HOW TO MAKE Spooky Ghost Brown Butter Pumpkin Cookies
Ingredients
To make Spooky Ghost Brown Butter Pumpkin Cookies, you will need:
- 1 batch Brown Butter and Maple Chewy Pumpkin Cookies by Butternut Bakery
- White chocolate
- Black candy melts
- Piping bag
- Medium cookie scoop
- Light colored baking pans
STEP-BY-STEP INSTRUCTIONS
- Bake the Cookies: Start by baking the pumpkin cookies according to the recipe. Make sure to allow them to fully cool on a wire rack after baking. This step is important as it ensures the cookies are sturdy enough for decorating.
- Melt the White Chocolate: Next, melt your white chocolate. You can use Ghirardelli melting wafers or any white chocolate of your choice. Melt the chocolate in a microwave-safe bowl, stirring every 15-20 seconds to avoid burning.
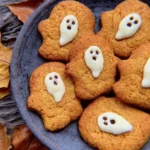
- Shape the Ghosts: Once the cookies are completely cool, spoon a small dollop of the melted white chocolate onto the center of each cookie. Using the back of a small spoon, apply light pressure and slowly drag the spoon down to create a ghost shape. If you are unsure, you can practice this technique on parchment paper before working on the actual cookies.
- Let the White Chocolate Harden: Allow the white chocolate to harden. This can take a bit of time, so be patient. You can put the cookies in the refrigerator for faster hardening.
- Melt the Black Candy Melts: Once the white chocolate has hardened, melt the black candy melts in a microwave-safe container. Pour the melted candy into a piping bag. If you don’t have a piping bag, a ziplock bag works fine too. Just cut a small tip off the corner of the bag.
- Pipe the Eyes and Mouth: Use the piping bag to pipe small dots onto the white chocolate to make the eyes and mouth of the ghosts. You can make them as big or as small as you like, depending on how spooky you want your cookies to look.
- Allow to Dry: Allow the candy melts to fully dry. This will ensure that the decorations stay in place when you handle the cookies.
- Enjoy Your Cookies: Once everything is dry, you can enjoy your Spooky Ghost Brown Butter Pumpkin Cookies!
HOW TO SERVE Spooky Ghost Brown Butter Pumpkin Cookies
You can serve these cookies on a festive Halloween platter or a simple white dish for a clean look. They make great treats for Halloween parties, school events, or just for a cozy night at home. For added fun, you can pair them with a glass of milk or a warm pumpkin spice latte. Set them out for guests to see, and watch everyone enjoy these spooky treats!
STORAGE & FREEZING: Spooky Ghost Brown Butter Pumpkin Cookies
To store your cookies, keep them in an airtight container at room temperature. They can last up to one week if stored properly. If you want to keep them longer, you can freeze them. Place the cookies in a single layer on a baking sheet and freeze for about an hour. After they are frozen, transfer them to a freezer-safe container or bag, layering with parchment paper if needed. When you are ready to eat them, let them thaw at room temperature for a few hours.
SERVING SUGGESTIONS
These cookies are fantastic on their own, but you can enhance your serving experience with some fun ideas! Consider serving them alongside:
- Warm apple cider
- Pumpkin spice latte
- Vanilla ice cream
- A fruit platter for a balance of sweet treats
You can also add a spooky touch to your serving by decorating your table with Halloween decorations, such as themed napkins or small pumpkins.
VARIATIONS
You can get creative with Spooky Ghost Brown Butter Pumpkin Cookies by trying some fun variations! Here are a few ideas:
- Chocolate Chip Ghosts: Add mini chocolate chips to the cookie batter for extra flavor.
- Different Toppings: Try using dark chocolate instead of black candy melts for the eyes and mouth.
- Royal Icing: Instead of using candy melts, you can decorate your ghosts with royal icing.
- Add Spices: Incorporate spices like cinnamon or nutmeg into the cookie batter for a different flavor twist.
Feel free to experiment and make these cookies your own!
FAQs
1. Can I use regular pumpkin instead of pumpkin puree?
Yes, you can use canned pumpkin or homemade pumpkin puree. Just make sure it is pure pumpkin and not pumpkin pie filling, which contains spices and sugar.
2. How can I make these cookies gluten-free?
To make gluten-free cookies, substitute the all-purpose flour with a gluten-free flour blend designed for baking.
3. Can I use different chocolates for the ghosts?
Absolutely! Use any kind of white chocolate or candy melts you prefer. You can even use milk or dark chocolate for a different look.
4. How do I know when the cookies are done baking?
The cookies are done when the edges start to turn golden and the centers look slightly puffy. They will continue to bake a bit after you remove them from the oven.
MAKE-AHEAD TIPS FOR Spooky Ghost Brown Butter Pumpkin Cookies
If you want to save time on baking day, you can prepare in advance! Here are some tips:
- Make the Cookie Dough Ahead: You can make the cookie dough and store it in the refrigerator for up to 24 hours before baking.
- Freeze the Cookie Dough: You can freeze the cookie dough balls, then bake them straight from the freezer. Just add a minute or two to the baking time.
- Prepare Toppings Ahead: Melt the white chocolate and black candy melts ahead of time and store them in the fridge. Reheat them gently in the microwave before using.
With these tips, you can enjoy delicious Spooky Ghost Brown Butter Pumpkin Cookies with ease! Happy baking!
Spooky Ghost Brown Butter Pumpkin Cookies
Ingredients
Method
- Bake the pumpkin cookies according to the recipe. Allow them to fully cool on a wire rack after baking.
- Melt the white chocolate in a microwave-safe bowl, stirring every 15-20 seconds to avoid burning.
- Once melted, spoon a dollop onto the center of each cooled cookie, using the back of a small spoon to create a ghost shape.
- Practice this technique on parchment paper if needed.
- Allow the white chocolate to harden, refrigerating for faster results if desired.
- Melt the black candy melts and pour them into a piping bag or ziplock bag with a cut corner.
- Pipe small dots onto the white chocolate for the ghosts' eyes and mouth.
- Allow the candy melts to fully dry before handling the cookies.
- Serve the cookies on a festive Halloween platter or a white dish. Pair them with milk or pumpkin spice latte.