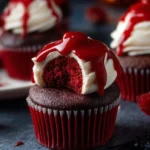
Vampire Bite Halloween Cupcakes: A Spooky Delight with a Deliciously Sinister Twist
Halloween brings out the fun and spooky side in everyone. We dress up, decorate our homes, and enjoy spooky snacks. One of these snacks is the Vampire Bite Halloween Cupcakes. These cupcakes are perfect for Halloween gatherings. With their rich red color and creamy filling, they look frightfully delicious. The cupcakes are not just good to look at; they also taste amazing. With each bite, you experience a mix of flavors that are perfect for the spooky season.
WHY YOU WILL LOVE THIS RECIPE
You will love these Vampire Bite Halloween Cupcakes for many reasons. First, they are a treat for the eyes. The deep red color and creamy top make them stand out. When you serve these cupcakes, everyone will admire their spooky look. Next, they taste incredible. The red velvet cupcake is rich and soft, while the filling is creamy and sweet. This creates a delicious contrast that will keep you wanting more.
Moreover, this recipe is fun to make. It involves a little creativity, especially when adding the vampire bite decoration. You can have a great time with friends or family while preparing them. Baking these cupcakes is a wonderful way to get into the Halloween spirit.
Lastly, these cupcakes are sure to impress your guests. Whether you are hosting a party or attending one, bringing these unique treats will make you the star of the event. They are simple yet striking, delicious yet spooky. What more could you ask for?
HOW TO MAKE Vampire Bite Halloween Cupcakes
Here’s how to make these spooky yet delicious Vampire Bite Halloween Cupcakes step by step.
Ingredients :
- 1 1/2 cups all-purpose flour
- 1 cup granulated sugar
- 1/2 cup unsalted butter, softened
- 2 large eggs
- 1/2 cup buttermilk
- 2 tbsp cocoa powder
- 1 tbsp red food coloring (gel-based for vibrant color)
- 1 tsp vanilla extract
- 1/2 tsp baking soda
- 1 tsp white vinegar
- 1/4 tsp salt
- 1/2 cup red velvet cake crumbs (from the cupcake centers)
- 1/3 cup sweetened condensed milk
- 1 tbsp unsalted butter, melted
- 1-2 tbsp red food coloring (for a vibrant, glossy red hue)
- 1 cup unsalted butter, softened
- 3-4 cups powdered sugar, sifted
- 2-3 tbsp milk or heavy cream
- A few drops of ivory or peach food coloring (adjust for a pale, skin-tone effect)
- 1 tsp vanilla extract
- Candy fangs or small dots of red gelatin (for puncture marks)
- Red syrup or edible red gel (for “blood” drips)
- Straws (watch out – they are not edible)

STEP-BY-STEP INSTRUCTIONS :
Step 1: Preheat and Prepare
Preheat your oven to 350°F (175°C). Line a 12-cup muffin tin with paper liners. This creates the canvas for your spooky cupcakes.
In a large mixing bowl, cream together the softened butter and sugar until light and fluffy, about 2-3 minutes. Add the eggs one at a time, beating well after each addition. Mix in the vanilla extract and red food coloring. This will give your cupcakes a deep, vibrant red hue.
Tip: To ensure even color, mix the food coloring into the butter and sugar before adding the dry ingredients.
Step 2: Mix and Bake
In a separate bowl, whisk together the flour, cocoa powder, and salt. Gradually add the dry ingredients to the wet mixture, alternating with the buttermilk, until just combined. Stir in the baking soda and vinegar mixture to help the cupcakes rise beautifully.
Spoon the batter into the prepared muffin tin, filling each cup about 2/3 full. Bake for 18-20 minutes, or until a toothpick inserted into the center comes out clean. Allow the cupcakes to cool in the pan for 5 minutes before transferring them to a wire rack to cool completely. Once cooled, carefully remove the paper liners. This will expose the deep red sides of the cupcakes.
Tip: Allowing the cupcakes to cool completely before decorating ensures smooth frosting application.
Step 3: Prepare the Creamy Spilling Red Velvet Filling
In a small bowl, combine the red velvet cake crumbs with sweetened condensed milk and melted butter. Stir until smooth and glossy. Add red food coloring for that intense, vibrant red. The filling should be creamy and slightly runny, ready to spill out when you cut into the cupcake.
Tip: If the filling is too thick, adjust the consistency by adding more sweetened condensed milk.
Step 4: Hollow Out the Cupcakes
When the cupcakes are cool, use a small knife or cupcake corer to remove a small section from the center of each cupcake. Fill each hole with the creamy red velvet filling, ensuring it reaches the top of the cavity.
Tip: Be gentle when removing the centers to avoid cracking the cupcakes.
Step 5: Make the Skin-Tone Buttercream Frosting
In a large bowl, beat the softened butter until creamy. Gradually add the powdered sugar, one cup at a time, mixing well after each addition. Add vanilla extract and 2 tablespoons of milk or cream. Beat until the frosting is smooth and fluffy. Add a few drops of ivory or peach food coloring to achieve a pale, skin-tone color.
Tip: If the frosting is too stiff, add more milk or cream until you reach a spreadable consistency.
Step 6: Frost the Cupcakes
Using an offset spatula or piping bag, frost each cupcake with the pale buttercream. The surface should be smooth and even, resembling delicate skin.
Tip: For an ultra-smooth finish, chill the frosted cupcakes for a few minutes.
Step 7: Create the Vampire Bite Decoration
Use candy fangs or small drops of red gelatin to create two puncture marks on the surface of each cupcake. Drizzle red syrup or edible gel from the puncture marks, letting it drip down the sides.
If you like, you can also use red straws for this effect. Add a few extra drips of red gel around the base of the cupcakes on the platter for an enhanced vampire theme.
Tip: Experiment a bit with the placement of the “blood” drips for a realistic look.
Step 8: Final Touches
Arrange the decorated cupcakes on a dark serving platter, surrounded by additional red syrup drips. This creates an extra spooky effect. The combination of the pale frosting, deep red velvet filling, and blood-like drips makes these cupcakes super irresistible and wickedly delicious.
Tip: For added drama, serve the cupcakes on a black or red platter with spooky decorations like plastic bats or candles.
HOW TO SERVE Vampire Bite Halloween Cupcakes
When serving these delightful cupcakes, presentation is key. Place them on a dark platter to highlight their spooky appeal. Adding props like fake spiders or candles can set the Halloween mood. Serve them at parties, family gatherings, or Halloween events. Guests will enjoy the chilling yet cute look while savoring each bite of the soft, luscious cake and the creamy filling.
STORAGE & FREEZING : Vampire Bite Halloween Cupcakes
If you have leftovers, store the cupcakes in an airtight container at room temperature. They will stay fresh for about 2-3 days. If you want to keep them longer, you can freeze the cupcakes without decorations. Place them in a single layer in an airtight container or wrap them tightly with plastic wrap. They can be stored in the freezer for up to 3 months.
To enjoy, let them thaw at room temperature for a few hours, then frost and decorate as desired. Freezing is a great way to prepare in advance for Halloween.
SERVING SUGGESTIONS
These Vampire Bite Halloween Cupcakes pair well with various Halloween-themed drinks. Try serving them with:
- Spooky punch with floating fruit eyeballs
- Blood-red fruit smoothies
- Hot chocolate with ghost marshmallows
Presenting your cupcakes alongside other themed snacks like ghost cookies or monster brownies will create an exciting dessert table.
VARIATIONS
You can play around with the flavors and colors in this recipe. Here are a few fun variations:
- Chocolate Blood Red Cupcakes: Add more cocoa powder for a chocolate flavor, and keep the red coloring for a spooky look.
- Pumpkin Spice Cupcakes: Use pumpkin puree and pumpkin spice mix in the batter. This brings in new flavors for fall.
- Different Fillings: Use raspberry or cherry filling instead of the red velvet. This gives a fruity twist to your cupcakes.
These these changes will keep your cupcakes fresh and exciting for different occasions!
FAQs
Q1: Can I use store-bought frosting instead of making my own?
A1: Yes, you can use store-bought frosting. Just ensure it’s a pale skin-tone color to keep the look consistent.
Q2: How do I make the filling less runny?
A2: If the filling is too runny, add more red velvet cake crumbs or sweetened condensed milk until you achieve the desired consistency.
Q3: Can these cupcakes be made gluten-free?
A3: Yes! You can substitute all-purpose flour with a gluten-free flour blend to make these cupcakes gluten-free.
Q4: How can I make the cupcakes less sweet?
A4: To reduce sweetness, use less sugar in the frosting and filling. You can also add a pinch of salt, which balances the flavors.
MAKE-AHEAD TIPS FOR Vampire Bite Halloween Cupcakes
To simplify your baking for Halloween, you can prepare certain parts in advance. Here are some tips:
- Bake Cupcakes Early: You can bake your cupcakes a day or two before serving. Store them in an airtight container at room temperature until you are ready to fill and frost.
- Prepare the Filling: The red velvet filling can also be made in advance. Store it in the fridge for up to two days.
- Make the Frosting Ahead of Time: You can prepare the buttercream frosting a day before. Just store it covered in the refrigerator. Whip it again for a few seconds before using it to restore its texture.
By preparing in advance, you can enjoy more time with your guests and less time in the kitchen when the big day arrives.
Now that you have everything you need, it’s time to roll up your sleeves and get baking. Enjoy your time making these spooky treats, and most importantly, have fun sharing them with friends and family! Happy Halloween!
Vampire Bite Halloween Cupcakes
Ingredients
Method
- Preheat your oven to 350°F (175°C). Line a 12-cup muffin tin with paper liners.
- Cream together the softened butter and sugar until light and fluffy, about 2-3 minutes. Add the eggs one at a time, beating well after each addition. Mix in the vanilla extract and red food coloring.
- Whisk together the flour, cocoa powder, and salt in a separate bowl. Gradually add the dry ingredients to the wet mixture, alternating with the buttermilk, until just combined.
- Stir in the baking soda and vinegar mixture. Spoon the batter into the prepared muffin tin, filling each cup about 2/3 full.
- Bake for 18-20 minutes, or until a toothpick inserted into the center comes out clean. Allow to cool in the pan for 5 minutes before transferring to a wire rack.
- In a small bowl, combine the red velvet cake crumbs with sweetened condensed milk and melted butter. Stir until smooth and glossy. Add red food coloring for intensity.
- Use a small knife or cupcake corer to remove a small section from the center of each cupcake and fill it with the creamy filling.
- Beat the softened butter until creamy. Gradually add the powdered sugar, mixing well. Add vanilla extract and milk or cream, then beat until smooth.
- Add a few drops of ivory or peach food coloring for a pale color.
- Frost each cupcake with the pale buttercream until smooth.
- Use candy fangs or drops of red gelatin to create puncture marks, drizzle red syrup or gel from the marks.
- Arrange the cupcakes on a dark serving platter and surround with additional red drips for a spooky effect.